Apple built Screen Sharing into the operating software on your Mac, known as macOS. It allows you to securely view or control another Mac on the same network. Or you can use it to let another user securely view or control your Mac.
When sharing with another computer, that computer sees everything on your screen. Depending on the settings, they can also control your Mac: installing apps, copying files, or restarting the machine entirely.
In order to access your Mac, users must sign in to an existing account on your computer or in your network. You can choose which accounts are and aren’t allowed to share your screen. Other users can sometimes request permission from you through a notification.
How to share your Mac’s screen with another computer
It might surprise you how easy it is to share your screen with another Mac. This is great for collaborating on projects or getting technical support while keeping your Mac secure. And you can do it all without installing third-party software!
We’ve explained everything you need to know about sharing your Mac screen below. Including a couple of alternative ways to do it and some troubleshooting suggestions in case it doesn’t work.
We’ve also touched on the exciting Sidecar feature for macOS Catalina+ and iPadOS that lets you use your iPad as a second display for your Mac!
About screen sharing on a Mac

Apple built Screen Sharing into the operating software on your Mac, known as macOS. It allows you to securely view or control another Mac on the same network. Or you can use it to let another user securely view or control your Mac.
When sharing with another computer, that computer sees everything on your screen. Depending on the settings, they can also control your Mac: installing apps, copying files, or restarting the machine entirely.
In order to access your Mac, users must sign in to an existing account on your computer or in your network. You can choose which accounts are and aren’t allowed to share your screen. Other users can sometimes request permission from you through a notification.
The only exception to this is when both computers are signed in to the same Apple ID account. In this situation, screen sharing begins without needing to sign in again.
By default, Screen Sharing is turned off on your Mac. You should only turn it on if you plan to use it, and you should only use it if you fully trust the other users.
How do I turn on Screen Sharing for my Mac?
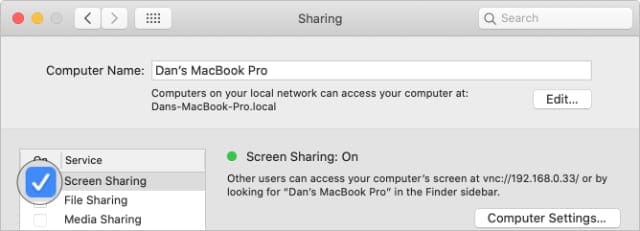
- From the menu bar on your Mac, go to > System Preferences… > Sharing.
- In the sidebar, check the box next to Screen Sharing to turn it on.
- Select Screen Sharing from the sidebar and you should see a green light to show it’s switched on.

The Screen Sharing light goes green when you turn it on.
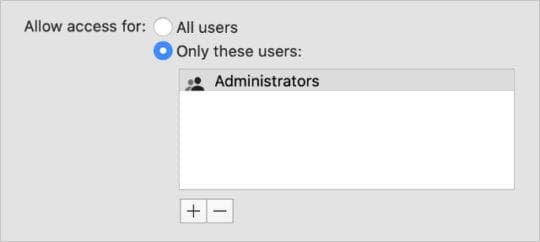
Beneath the Screen Sharing light is an option to allow access for All users or Only these users. This decides who can access your Mac. It refers to the user accounts on your Mac or on your network.
If you select All users, anyone with a user account on your Mac or in your network can enter their name and password to access your Mac. This doesn’t include guest accounts or sharing-only accounts.
If you select Only these users, you can choose the specific users or groups of users who can gain access. Do this by adding or removing users with the plus (+) and minus (-) buttons. You can select any users from your Mac or on your network.

VNC Computer Settings
Screen Sharing on your Mac uses Virtual Network Computing (VNC) to link systems together. This allows users without a Mac to request access to your computer by visiting the VNC address.
Click the Computer Settings… button to edit how people can connect to your Mac using VNC. In the window that appears, you can choose to let anyone request permission to control your screen or create a password they need to use.
If you allow it, users without an authorized account can still request permission to share your screen. When they do this, a notification appears on your screen for you to approve or deny permission.

